
Not sure if this is where this thread should be.
Regarding a winter project.
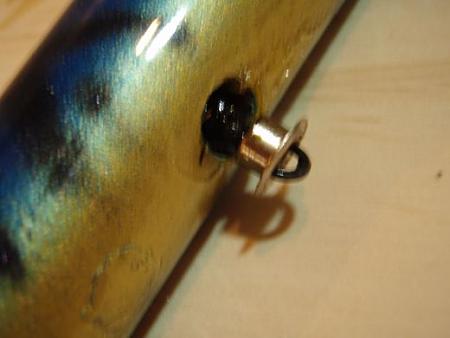
These plugs need some repair work.
Any helpful hints?
Cracked.
Is just epoxying this one all that is required?
Will it be OK then or is it shot?


 Senior Member
Not sure if this is where this thread should be.
Regarding a winter project.
These plugs need some repair work.
Any helpful hints?
Cracked.
Is just epoxying this one all that is required?
Will it be OK then or is it shot?
White Water Monty 2.00 (WWM)
Future Long Islander (ASAP)
 Senior Member
hello salty brother,shoot me some pix,chances are we can fix 'em.Originally Posted by Monty

R-P
Takes a Big Man to sling Big Wood,,,,boys sling plastic,,,,,,,
Senior Member
On the first white one, it could have cracked because something happened that it didn't dry completely before they started working on it. No offense to the builder, sometimes it happens even with the best of plugs. I would hand sand it down with rough sandpaper going to fine, and feather edge the areas around the crack without changing the outside dimensions of the plug too much. Then set up some e-tex or maybe an epoxy paint from a spray can if you don't have a gun. Use very light coats at first covering the whole plug but mostly the affected area. Don't allow it to run, hence the reason for the light coats.
As for the hook holders that got pulled out, nice fish.
I would put them back, fill with plastic wood in the deepest part inside to fill it in. Leave a slight depression and fill with self-hardening epoxy. Be careful to use a toothpick for the epoxy so it doesn't interfere with the movement of the hook. You just want to concentrate it under the grommet, and the plastic wood will make it firmer inside. Once that dries, sand down carefully, and re-seal with epoxy paint again.
You can also use clear acrylic from a can, but the finish won't last as long. Hope this helps.
Senior Member
What ledhead says. It also depends on the plug. I have some that are bluefish beaters. For ones like that, I would put them back together as quick as possible and not worry about the liquid wood and all that. A quick dab of epoxy gel, let it harden, seal up if you want with one coat of clear from a spray can, and you're done.
The most important advice I can add is change your hooks to vmcs if your points are dull. It's a heartache to lose a fish due to a pulled hook. It's also a bummer if your hooks weren't sharp enough and you missed your season't best fish because of it.
Senior Member
I have had grommets pull out. Just dab some epoxy on it and stick it back in place. It will hold.
I don't know about the cracked plug. It may just need some sanding and epoxy. I had used a Mag Darter with the as s end split and used it until the through wire was bent too much to use any more.
Senior Member
did we ever fix this one?,,,I don't rememeber if we did,if not and you still have the plug I know how to fix it.
Takes a Big Man to sling Big Wood,,,,boys sling plastic,,,,,,,
 Senior Member
this was throw away ....I added the lip back ...I didn't want to paint the wood ..wanted the epoxy to soak into the repair ...better than new
Senior Member
Wow that's an incredible fix. How did you do that if you don't mind me asking? It looks like you added wood to it but that's not possible is it?
Senior Member
I would like to know as well. Awesome repair how did you make it happen- epoxy?
 Senior Member
either wood filler or a plumbers epoxy lay it in and sand away and repeat until you get the shape back apply epoxy good as new most of the time.Plugs with wooden lips I prefer wood filler to keep the weight closer to the original,epoxy can get heavy an throw off the action on those type of plugs.Another tip using epoxy is to not sand it any finer then 150 grit because anything finer will not allow the epoxy to grab property resulting in a crack and also sand lightly in between coats.Make sure the plug is free of dust at all times wearing vinyl gloves to keep the oil from your fingers off the epoxy or you get the famed fish eye.
Cranky Old Bassturd.
Senior Member
no wood filler ....just grind the clip away to a flat area ....epoxy in a larger piece of wood in ...which hangs over every edge .....sand to couture the lip ....then I sanded the plug and used glitter technology to finish it off ....I wanted the epoxy to soak into the new wood and joint to made it stronger ...could of primed it ...then used glitter technology ....something I don't fish ....gave it back to the kid that threw it out
 Posting Permissions

 Reply With Quote
