Member
Senior Member
Member
Senior Member
Originally Posted by LEON


Member
Pics! Ya Dinna want ma Mug Shot on yer Screen IT WOULD SHATTER!
Meantime This One Will Change the Thread. And Keep Ya All Busy!
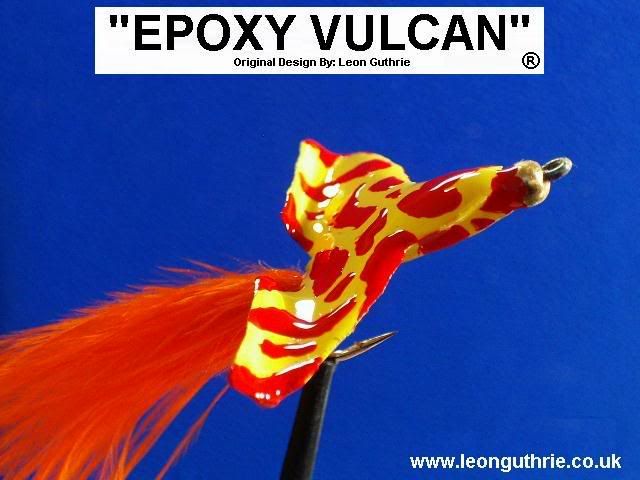
EPOXY VULCAN :
I have had Several E-Mail Requests and Kind Comments on my Epoxy Novelty Patterns. These Are not Difficult at All. And those who wish to Create there own Special Pattern. Here is An Easy One For you to Create and get the Hang of it.
The Vulcan In the Images is not even Using "Clear" Epoxy but just Normal Epoxy that Go's slightly Milky in Colour.
But Once your Creation Is Finally Built. Leave it For a Good Few Days to Harden Completely. Happy Building.
EPOXY VULCAN BUILD (By Leon Guthrie)
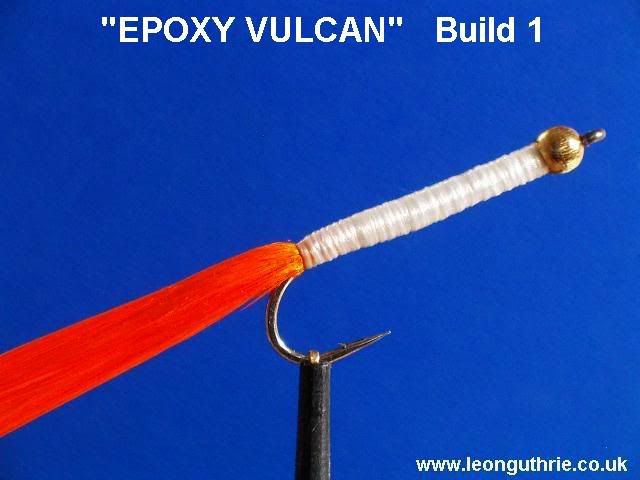
Build 1.
Hook: Kamasan B830 Size 8
Head: 3.3mm Gold Tungsten Bead
Tail: Marabou (Any Colour You Want)
Body: Any Thread Build Up Almost Level With Height of Bead
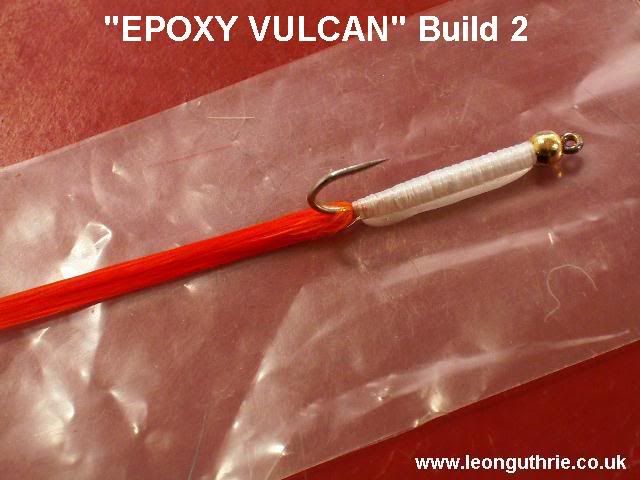
Build 2.
Mix Epoxy And Place Only on BACK. And Sit on a piece of Freezer Bag Polythene
Wait Until Completely Set.
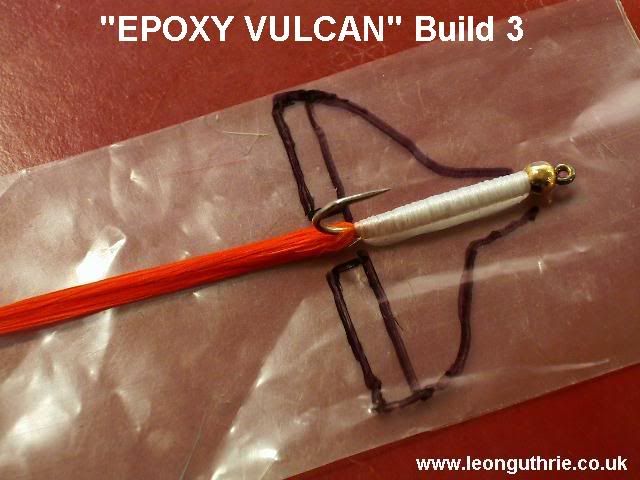
Build 3.
Draw Shape of the Vulcan Delta Wings and The Ailerons as in Photo Image
Build 4.
Mix More Epoxy and Only Cover Wings as Shown in Image. It does not Matter if you go over the lines etc..or make any mistakes as these can be corrected later with Sharp
Model Knife or Apply other Epoxy to Repair Area’s That Require Some More Epoxy.
Note: You Must leave the Vulcan Alone now for 24 hours and Completely Hard.
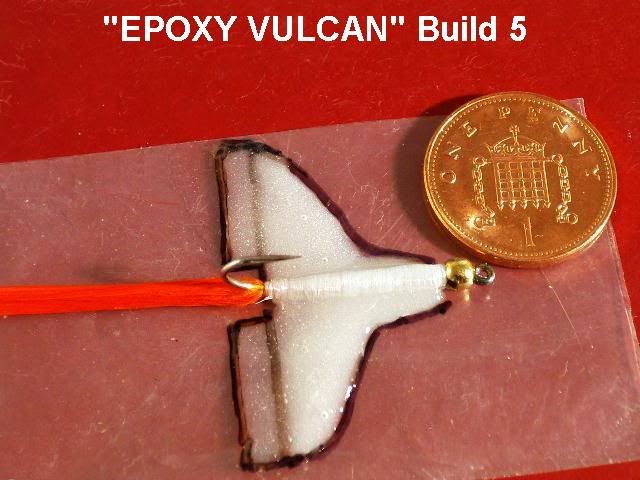
Build 5.
Now Mix More Epoxy and Only Apply to the Make the Ailerons. Make Slightly Larger over the Guide Lines You can Trim These Straight Later.
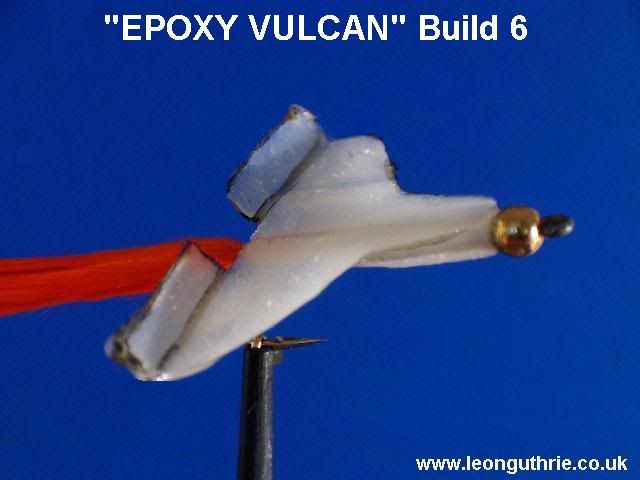
Build 6.
Wait Until Ailerons are Set to the Touch and feel quite Hard. Then you can Carefully Take the Vulcan Off the Polythene Sheet (Without Tearing the Semi Set Ailerons) If in Doubt, Wait A little longer as you will still be able to bend the Ailerons to the Required Elevation. As in the Photo Image.
When you are Satisfied the Ailerons Are Set and Shaped as Required. Then Mix More
Epoxy and Build this on to take the Flat Surface Away as it had been sitting on the flat Polythene Sheet. You will Just have to Judge Where to Build Up the Shape and Contours of the Vulcan.
Build 7.
The Finished Epoxy Vulcan. Painted with Enamel Paint with Whatever Colour or Combination of Colours you Require.
Note: Because of the Weighted Head and Position of the Ailerons. A Sink And Draw Retrieve is Employed. As The Vulcan Sinks Each Time it will Create a Crashing Wiggling Decent. So Use Your Pilot Skills. Also a Fast Retrieve Will Produce this Erratic Movement. The Length of The Marabou Protruding From the Rear is Measured at 2” And there is no Difficulty In Large Double Figure Trout and Salmon
Taking this Down It’s GOB!
Senior Member
Um, Leon, just a thought, but I think cowherder was referring to pics of Katie? I don't think he wanted a pic of you, not that there's anything wrong with that.BTW, great pics you are putting up here, welcome to the forum. I wondered about the difference between clear and normal epoxy, and when you would use one over the other? Also, what's a GOB?

Member
Ah" Mabe your Right, But Dinna Worry about me. It's an Age Thing.Brain Damage or Dimentia Setting In.
Oh! And A "Gob" Is a (Mouth) The Thing That Words of Blasphemy Mutters From Now and Again! Geeze! You Un-Educated People Out There.
Senior Member
That's some incredible work Leon.
Member
Cheers Surferman!
Surface Skimmer Lure
If You think the Epoxy Vulcan is Good. Then Perhaps You would like to see the Epoxy Shield Bug! Totally made of Epoxy and Enamel Paints.
http://www.angelfire.com/wa/salmonid/leon33.html
Member
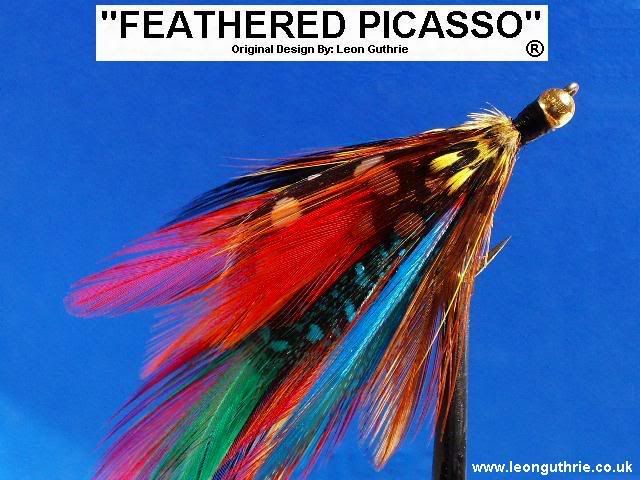
FEATHERED PICASSO
One of my Favourite Lures! Trout/Salmon/Seatrout/Steelhead Rainbows. Pleasure To Use!
Hook: Kamasan B830 Size 10 (Hook Eye Heated and Straightened) De-Barbed.
Head: 3.3mm Gold Tungsten Bead.
Body: Mixture of Various Whole Feathers
Neck: Black UTC Thread Grade Size 70 Denier.
Senior Member
Leon, great job. Do you have any pics of the fish you are catching with these?
Member
Catch Plenty of Fish of all sorts with this Pattern. The only thing is the fish tend to be Camera Shy and will Not Keep Bleedin still . They Won't Pose or Even Smile. So I just chuck them back in the water to fight another Day.
Senior Member
Member
Indeed So My Good Man!
But You 2 are an Artist like Picasso! So it it just a Matter of Putting on Feathers in your own artistic form and getting up at the Crack Of Dawn! and go Fishing.

Senior Member
Hey Leon, How'd you get that picture of me?
Member
You got a Bad Memory or Somefing!
Anyway! My Mussus's Butt Used to look like that at One time. Now after So many Years Cuddling Into Her! She has Left Her Mark!
2 Bloody Great Indentations on My Belly!
Member
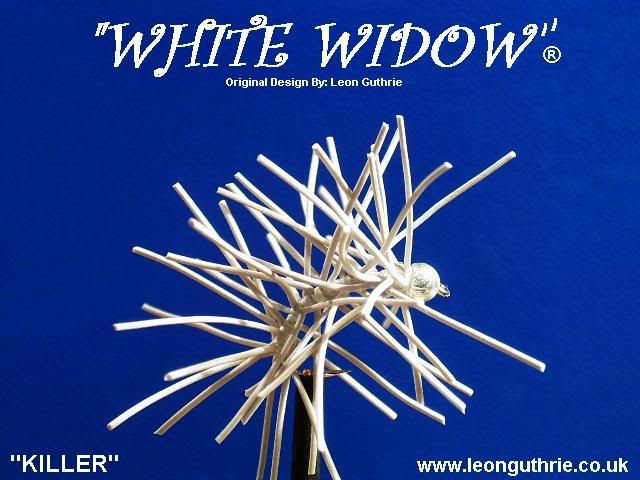
WHITE WIDOW
Hook: Kamasan B100N (Nickle Silver) Size 10
Head: 3.3mm Silver Bead
Hook Shank: White Silk
Body: 1" Lengths of Round White Elastic Chord (Random Positions)
Senior Member
OK Leon you have me stumped here. Is this supposed to represent a caterpillar, or a genetically mutated spider? I give up, what is the natural forage that this mimics?
Senior Member
Never saw anything like that before. What have you caught with it? Great Lure.
Member
WHAT! You haven't Seen a Chernobyle Spider Before! Good Grief!
This Creepy Crawly has Loads of Movement to Attract the most wary of fishes.Try One and see for yourself! But mind it does not get caught in the back of your Throat!
Member
Voyager35
What I have Caught with it "Plugcrazy" (Below)

Member
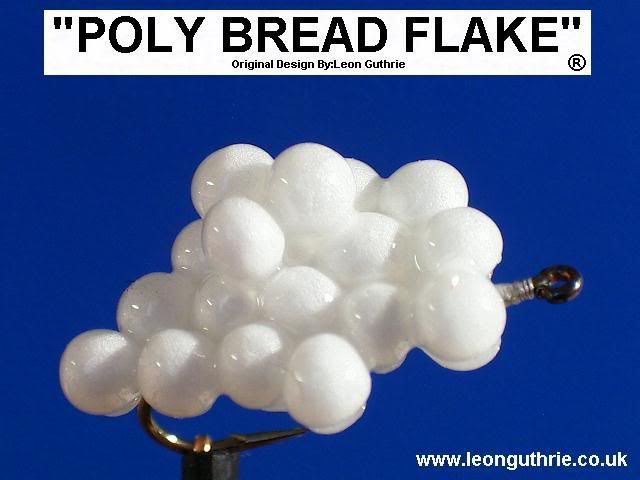
POLY BREAD FLAKE (Surface Dry Lure) :
(Below) SIZE DIMENSIONS
(Below) OPTIONAL TO USE UV LIGHT TO CURE EPOXY GLUE FASTER
Hook: Kamasan B830 Size 10 (Hook Eye Heated And Straightened)
Hook Shank: Bedded With White Thread
Body: 18 to 20 Smallest Polystyrene Balls.Wetted with Epoxy Glue.Transported and Placed on Polythene Bag Touching Each other Side-By-Side. Leave to set (Or Use UV Light to Cure Faster)
Hook: Placed On Underside and Secured With Epoxy Glue.
Note: Optional to use either Standard Epoxy Glue or "Permabond" Rapid UV Curing Glue.
http://www.permabond.com/en/en-uvcurables.htm
 Posting Permissions


 Reply With Quote